Showing posts with label Creating. Show all posts

6.25.2014

A Bathroom Makeover...


 ... in iphone photos. Because I'm lazy like that. :)

This happened ages ago, back when I was in my never-ending-depression-of-doom. At the time, projects were the only thing that got me out of bed. That and chocolate.

Now, ideally, if we were going to put money into remodeling a bathroom, it would be MY bathroom, not the kids'. Unfortunately, theirs took precedence once they'd flooded it one time too many and we ended up with water dripping thru the ceiling into the living room. Like so:


{I know it's odd to have an outlet in the ceiling, but we had the room wired for a projector. Then we bought a flatscreen and the projector never happened.}

Anyhow, this is where the kids' bathroom started:


I know. Breathtaking. I remember thinking that this particular green color {Martha Stewart's Hellebore} was so fresh. ha! Instead, it has always made me feel a bit seasick in there. Hindsight.

The fan is there to dry out what we thought was the subfloor. {It wasn't.}We ended up ripping that layer of particle board out, much to my relief. It looked too damaged to save.

I was determined to make the place more waterproof, which meant tile, tile, tile! We went to a local discount tile warehouse and picked out this baby:


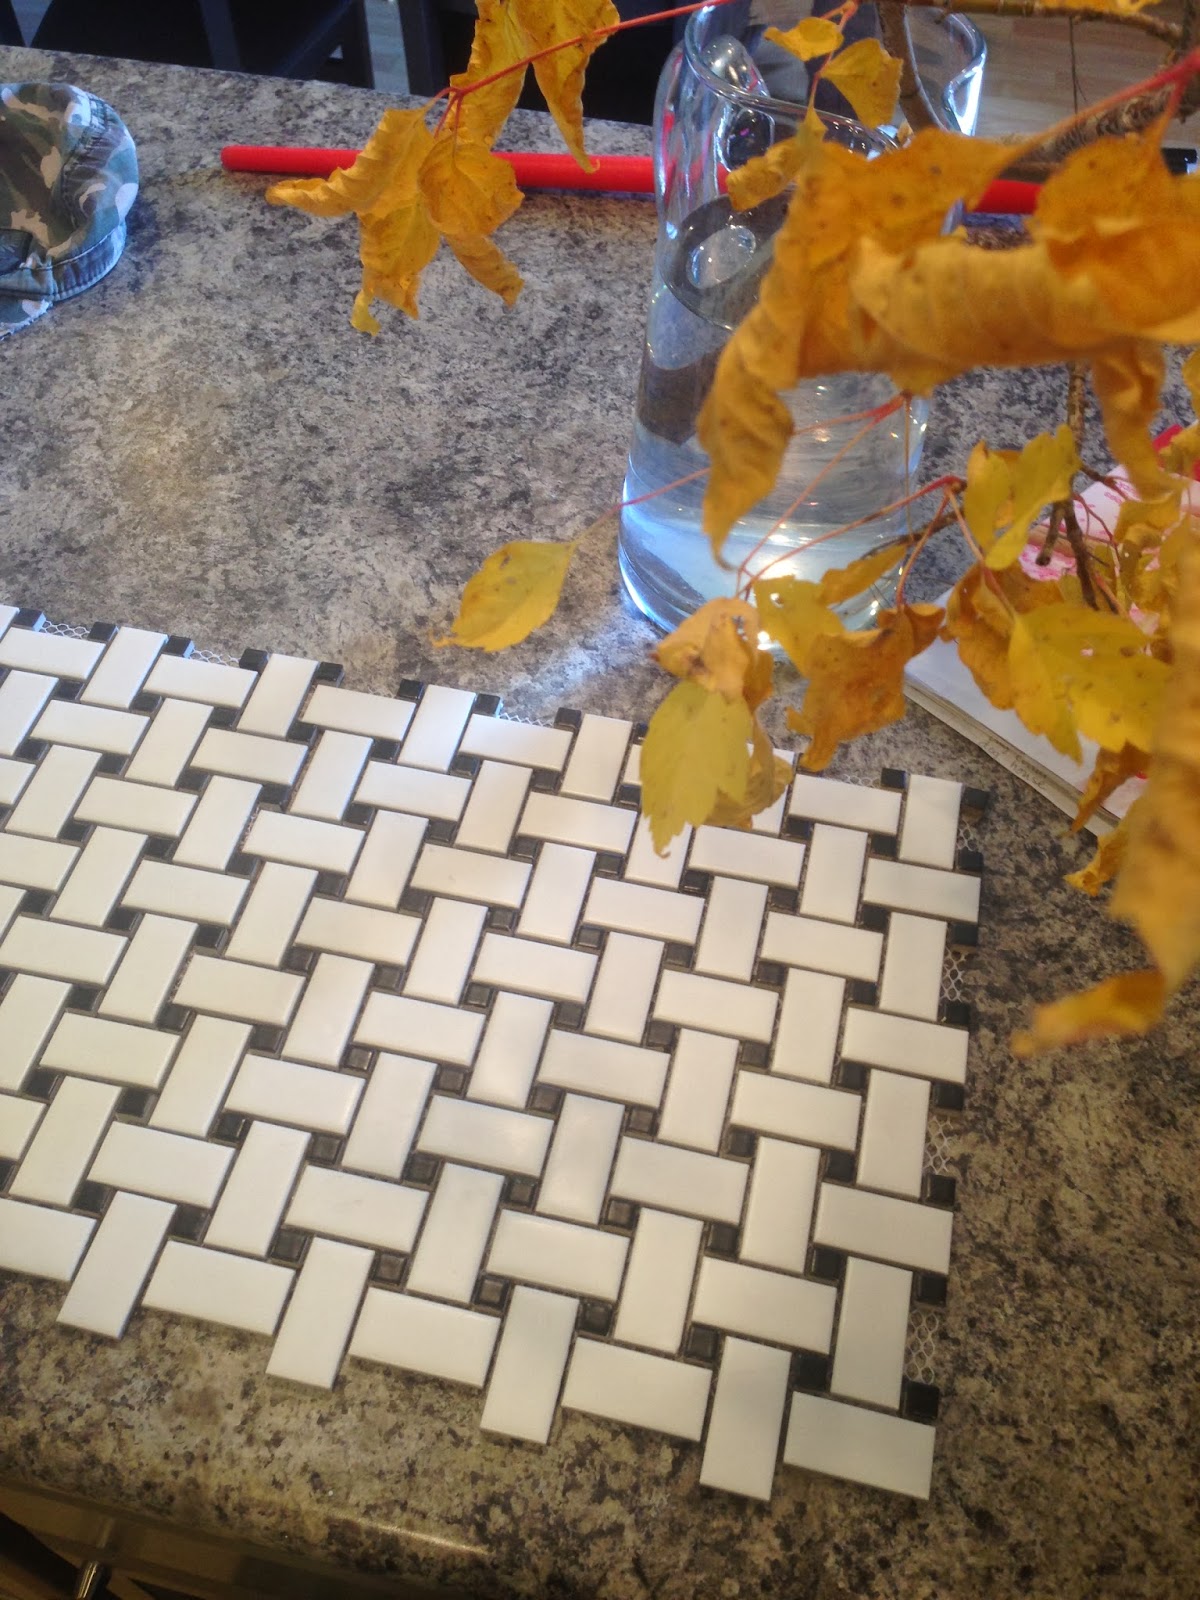
J really wanted a classic black and white checkerboard, but the basket weave felt more interesting to me. Also, it was a mosaic tile on a mesh background, which meant 1} they would be less likely to crack in an upstairs location, and 2) that tile-cutting would be much easier than it would be with large tiles.

After ripping out the particle board, we laid cement board {waterproof!} and then started putting in tile. Since the entire room was going to be a big mess, I also took the opportunity to paint the bathroom cabinets white, using the same BM Advance Paint that I used on my kitchen cabinets:


This is where I ran out of tile. {Math has never been my strong suite.} Back to the store!


After spending hours tiling, my eyes were at risk of developing permanent damage if forced to look at that green for one more second. I mixed every left-over can of blue paint I had and rolled over the kermit color.


So much better:


After all that came grouting! E was dying to help out, and I wasn't about to stop him. :) It turned out to be quite fun on the subway tile. For the floor, we used black grout and it was SOOOO messy. I think I was a bit over-vigourous in wiping it clean. I like the grout to feel flush with the tile-- not to divot in at all-- and I didn't quite achieve that with the floor. Still, it's a vast improvement over the laminate that was there before, and it feels good on the feet.


Just when J thought this project couldn't possibly cost another cent, I also went out and bought a new shower curtain, some shelves, hooks, and frames. You know, necessities.


I have to say, I loooooove it. Especially having hooks instead of a towel rod. Chances of having a towel actually make it off the floor increased from 0% to at least 10%.


This all happened back in November, which is really when I should have been doing outdoor stuff. Now it's 108 degrees outside and I'm stuck indoors when what I really want to do is build my shed. :( Brilliant planning on my part, I know.

Anyone have awesome projects in the works? Do tell.

12.08.2013

2013 Christmas Video

Merry Christmas!


A little late, but we finally wrapped up our annual Christmas Video {in lieu of sending out cards}. We chose to go in a different direction this year, drawing inspiration from our  love of musical instruments, small towns, and Wes Anderson quirkiness.


As always, we send it out hoping it brings you a bit of cheer and finds you safe and well. I, especially want to thank all of you for your friendship and prayers. There aren't words enough to express how much you mean to me.


God bless us, every one. :)


I Saw Three Ships from Jared Foster on Vimeo.

PS-- If you'd like to see all of our past Christmas Videos, the links are in my sidebar---->

12.03.2013

Card Catalogue Media Console


Remember those amazing drawers I spotted in an old plane hanger where my dad works? I loved the way they were perfectly imperfect. Handmade, weathered, layered with paint and labeled with yellowing masking tape. I snapped the above photo of them and then must have talked them up quite a bit, because a month or so later, my dad called to say that he'd bought them from his boss for a six pack of -er- drinks. ;)

We brought them home after I spent the summer with my parents again this year. We nearly killed ourselves lifting them onto the roof {those things are HEAVY} and burnt up the transmission. {I guess you can't go 80 mph over a mountain pass while hauling a few hundred pounds of card catalogues. Now you know.}

But it was worth it. Because I turned those drawers into this:


I'm in love. We can never, ever, ever move from this house because it will be impossible to budge this beast, let alone maneuver it out of a door; but still-- I'm in love. 

Here's how I did it:


I built it in a weekend, and since I was working alone, I chose to do it in the room where it would be placed. Because HEAVY.

The drawers were actually two separate pieces that had, at one point, been one unit. {Over the years, someone had cut it in half and stacked the two halves on top of each other, so I was just 'restoring' it.}

I bought two sheets of 3/4" Birch Plywood that I had cut to size at Home Depot. After drilling all my pocket holes and installing 5 vintage furniture legs on the bottom slab, I assembled the frame around the old card catalogue drawers and ended up with this:


That top shelf was waaay too tall. After conducting a quick poll via text-message, I confirmed that the rule of thirds was being blatantly violated and took a skill saw and fence to it to remedy the situation. Much better:


Next, I mixed up two batches of chalk paint using this recipe. One was a darker turquoise type blue called Araucana by Martha Stewart. The second was a light minty blue. {it was made by just mixing a bunch of leftover paint I had, so no name or brand, sorry.}

I painted the entire thing with Araucana first, then sanded it lightly before layering the minty blue on top of it and sanding it again. As I sanded, bits of the darker Araucana blue and even the original forest green would show through. Which is exactly why I wanted to use chalk paint-- I wanted this piece to have the weathered texture and patina that I loved, without having to incorporate forest green into my design scheme. ;)


After lots of painting and sanding {and cleaning up all the minty green dust left behind} I had to wax and buff the entire thing. Oh, those drawers. I had to wax Every. Single. One.


This is where the color really started to come alive. The wax somehow revealed all the layers that had been hidden under a dusty top coat:


See how it all looks mint green except for the waxed portion on the interior drawer? Suddenly you see the darker blue! So cool. {And Oh! How I love all that chipping!}


Next, I had to house all the media components and hide the wires. Most of those cables ended up in the wall, but I was glad for the hidden ledge for all the power strips and stuff.


Finally, I ordered 75 antique brass card catalogue pulls with brass screws, centered them as best I could, and printed off labels as a finishing touch.


And that, my friends, is how I ended up with the coolest media console EVER.

While I still haven't finished styling it, {I want to hang the television on the wall and perhaps replace all those books on the shelves with graphic black and white boxes like this and this} I have to say that I just may want to be buried in this thing. Yes, it would take a crane to lower it into the ground, but as with everything related to this beauty-- it would be worth it. :)


PS- I have conflicting emotions about the missing drawers. Too distracting? Adds character? I had planned on building replacements, but they're starting to grow on me. Maybe leave just two or three empty?


6.13.2013

Building A Chicken Coop


Well. Can I just say it's been a long silence? It has been. A looong silence.

I've been busy building, both literally and figuratively, but since I'm still in a bit of a delicate emotional state, I think I'll stick to talking about the literal today.

*ahem*

BEHOLD:


I DESIGNED AND BUILT A CHICKEN COOP!

It's modern. It's beautiful. It's ridiculously large. And it's exactly what I've been picturing for the last two years. Just to give you an idea of what we started out with, let me show you the (extremely embarrassing) BEFORE picture:


I told you. Just awful. The chicken wire fence was constantly being bent and clambered over by children, the shade and shelter was almost non-existant {the doors leaning against each other was an incredibly lame, short-term attempt to remedy that} and the chickens had taken to escaping their confines regularly. I was fed up with looking at it. 

AFTER:


Seriously, so much better. I still have to address the short mason-block fence around it {probably paint it a dark grey to blend better with the henhouse and run, but eventually might cover it with stone veneer} and build steps to the door, but it's pretty much done. Enough that I spend waaaay too much time staring at it admiringly.


It all started when J bought me a pocket jig. I'd been wanting one for ages, since nearly everything I'd seen Ana White or John and Sherry build had used it. Then, we inherited a compound miter saw, and suddenly anything seemed possible. :) J indulged me, and for the next few weeks, our date nights consisted of trips to the hardware store and evenings covered in sawdust and paint.

At first, we were only going to build the chicken run. You know, for financial reasons. I did all the math, sketched out plans, made a cut list and we built wall panels. {They're tall, because I wanted to be able to walk inside for ease of cleaning and maintenance. Plus, the kids hang out with the chickens like they're kittens and puppies or something.}  I pre-painted them,  assembled, and screened in the sides with hardware cloth, which both looked cleaner and held up better than chicken wire.


Shade cloth was secured to the top, which lowered the temperature in the run and also prevented our more ambitious hens from trying to fly out. Then we build a door and added my favorite feature-- a spring loaded door closer. No more escaping chickens!


{I need one of those for my back door. Seriously. I'm considering switching out our sliding glass doors for french doors JUST so I can use a door-closer!} 

That would have been that, except that our neighbor saw what we were doing and offered us tons of scrap lumber. He works as a landscaper, so he had all these 2 x 4's that had been used as concrete molds stacked up beside his house. We looked at that and thought, "why not frame up the henhouse as well?" 

So we did.


We spent a long weekend framing, installing and painting. I got very sunburned.


Of course, it's hard to stop at just framing. We were so close to being done, my stubbornness kicked in and we just went for it. I haven't even added up the receipts yet. I'm too scared. 

We did try to stay as frugal as possible without compromising the look and function I wanted. We chose cedar fence pickets for the siding, since it was less than half the cost of using sheets of T1-11 siding. It probably wouldn't be water-tight enough for any other state, but here in the desert, it works just fine. Plus! When the sun warms it, it smells heavenly. 


It was at about this point that I started to think, "Really? All this for chickens? This could be such a cool clubhouse..." But we pressed on. 

As you can see, I thought it was easier to pre-paint, apply siding, paint the siding, and THEN install the walls on to the base. We did this with all but the last wall. Then we ran out of primer, but I was too impatient to pause work in order to take yet ANOTHER trip to the hardware store, so we put up the roof without pre-painting....


And lived to regret it:


You should have seen all the paint I had in my hair. painting the interior ceiling of a chicken coop is much more difficult in situ. Lesson learned. 


A lot of the things we did to build the henhouse felt like practice for when we build a shed in the fall. That's part of the reason we went ahead and put a 'real' roof on, with builder's felt, a drip edge and shingles. 


Then came all the finishing touches. 

I designed the entire front wall of the henhouse to hinge open so we could easily muck it out weekly. Here it is CLOSED:


And OPEN: 


It also helps increase airflow on hot days. And I built those two levels of roosting perches. {from scratch! L-brackets! Mitered cuts!} So far, they prefer the top one. 

I get a geeky thrill seeing how perfectly the bottom of the door/wall lines up with the first beam of the run, so it can be held open like that. Perfection!


The nesting box can be accessed from the outside of the coop, even though we didn't go for the traditional exterior-mounted nesting box. {Purely for cosmetic reasons. I think it looks better this way.} The chain keeps the kids from destroying the hardware and paint by allowing the door to fall open, and it also provides a nice little shelf for collecting eggs. So far, there's no lock. I'm installing rare earth magnets instead, because we don't have many predators to worry about and all the locks I looked at weren't pretty enough to be front and center.


Lastly, I enlisted the help of E to fill all the holes from the screws. Again, purely cosmetic. We used galvanized outdoor screws, so there was no fear of rusting. I just liked the clean look of having them all filled and painted over.


And that is how I became the proud owner of a gorgeous chicken coop. Also, the most expensive eggs in history. :)

1.18.2013

Coconut Sugar Scrub


Thank you all for your warm response to this weeks posts. With each comment and email, I felt so loved. You are the reason that this has always been a safe place for me to talk.

However, today I'm taking a break from the heavy stuff! It's Friday, which means I'll be indulging in my newest pampering obsession: soaking in a warm bath and using my homemade Coconut Sugar Scrub. I can't remember where I first heard about it, but someone said they used it instead of shaving gel and that it did wonders for sensitive skin. I gave it a shot, and seriously? My skin was sooo silky. I'm totally addicted now.

The recipe is simple:

2 cups sugar {or salt, if you're concerned about bacterial growth or plan to use it in the bikini area}
1 cup coconut oil
5 tablespoons fresh squeezed lemon juice
lemon zest

Mix it all together and keep it in a jar by the bathtub. I like to soak, exfoliate, shave, then apply a bit of plain coconut oil or unscented lotion once I get out. I've been saved from dry, itchy skin all winter!

Happy Weekend, all!

{lovely image via sugarandcloth}

12.20.2012

Behind the Scenes

As much as I love a polished, finished product, sometimes I can't help but love the process of creating something even more than seeing it completed. Perhaps you're like that, too? If so, here's a little glimpse of what went in to making this year's Christmas Video. 


After spotting this image on Pinterest, I knew I wanted to play with lights and silhouettes. J brought home as many large, cardboard boxes as he could fold into the mini cooper, and I proceeded to cut out mountains and pine trees with a box cutter.

Next, I tested out the effect by taping twinkle lights to the back.


Once satisfied, we dragged all the cardboard out to the backyard and painted them with left-over white house paint. Unfortunately, the silhouettes immediately started to curl inward, so we ended up having to press them flat again under 5 gallon buckets of wheat. :)


Then we dragged all the cardboard back upstairs to transform my bedroom into a winter wonderland. Instead of fake snow, we spread out white sheets and blankets on the ground-- the OFELIA blanket from IKEA had the perfect snowy texture.


We always get requests to see the entire family in one shot, so that was the goal this year. We bribed the kids with marshmallows, and managed to keep the baby in the room for a few consecutive minutes on camera! Oh-- and I rubbed a bit of my lipstick onto their cheeks to give them all a rosy glow. ;)


One of my favorite creations was the little paper campfire. The rocks were just crumpled sheets of printer paper and we stuck a ball of Christmas lights under the blanket to make it all glow!


I kinda-sorta fell in love with this fuzzy hat. We have absolutely no use for it here in the desert, but I thought it brought out my Ukrainian heritage nicely. :) If you'll notice, I have my hand on the hat in a lot of the shots, and that's because I was covering the tag-- I returned most of the props after using them for the one-day shoot.

The aspen tree set was SUPER cheap to make. We cut strips of paper from the MALA drawing paper roll in half, lengthwise, and taped them to the ceiling and floor of the living room.

Then I just slapped on a few brushstrokes of gray paint from my vast collection of Martha Stewart paint samples. :) Voila!


The lighting was much better the next morning. :) The kids were fascinated with the overnight forest, and couldn't wait till we were done filming so they could run around and tear them all down.


And as usual, we were grateful to be filming in our own house so we could work around the inevitable temper tantrums and Baby R's naps-in-the-middle-of-the-floor.


This was the first year that we filmed before Thanksgiving , and we really missed living off of leftover turkey and pie. Stopping to make a meal was such a pain. But we managed to knock it out over a short weekend, hand-letter the title cards, and call it a year!

Until next time. ;)


Related Posts Plugin for WordPress, Blogger...